Showing posts with label Learn to play Guitar. Show all posts

Saturday 29 October 2016

Learn to play Guitar: Lesson # 14 : How to tune a guitar

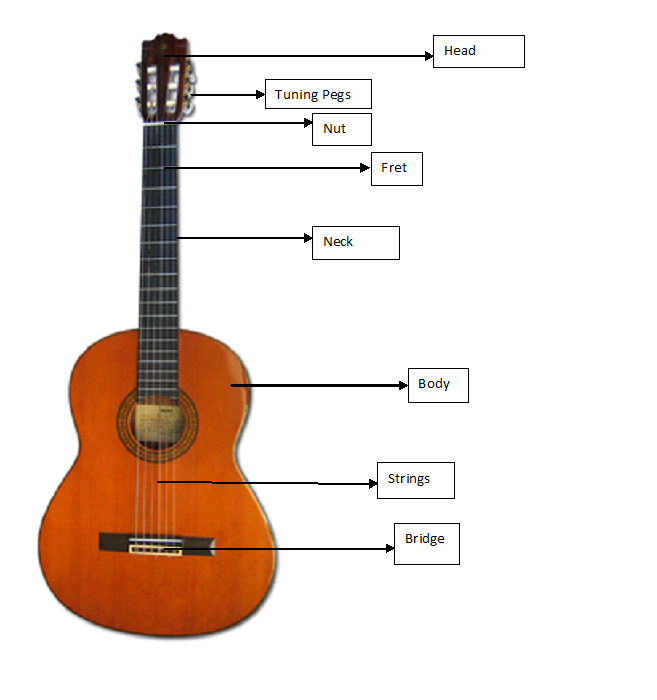
A guitar have to be tuned. By tuning, we mean the notes and the pitches of the strings can be changed to match the standard. To do that, Tuning pegs located in the guitar head are used. The tuning pegs if rotated clockwise or anticlockwise direction can shift the note and pitch of the string. Before playing a guitar, it is necessary to check the tuning of the guitar and if tuning is out of order then it is necessary to tune the guitar before playing .

There are two ways you can tune a guitar,
1. Tuning the guitar using a tuner
2. Tuning Manually ( by comparing all the strings with one another)

1. Tuning the guitar using a tuner
It may sound to you that in this way, we can automatically tune the guitar through some electronics device . Actually, this is not the case. There are international standards for tuning a musical instrument.

For guitar,there is an international standard pitch which has to be used for free guitar strings.
Usually international standard is called A440, it actually refers to the frequency of 440 Hz. The 440 Hz frequency of sound plays the musical note of A with the pitch of 4th Octave in a standard Piano(for reference) .

Now , If we want our guitar to be tuned , we can use the guitar tuner.
What guitar tuner does is that it indicates which note is being played but the pitch doesn't matter(unless it is a chromatic tuner).

Following are the steps required to tune the guitar with the help of a Guitar tuner.

Step 1. Turn on the guitar tuner
Step 2. Put it either in the head of the guitar or the body.
Step 3. Pluck the last string E(Bass E) and check the tuner display.
Step 4. If the tuner displays F or above then rotate the tuning pegs clockwise.
       OR If the tuner displays D# or below then rotate the tuning pegs counter-clockwise.
Step 5. Confirm the note of the string is E from tuner display(indicated by color or meter turned to 0 etc) by plucking the string few times with interval.
Step 6. Repeat the same for all the strings.

2. Tuning Manually ( by comparing all the strings with one another) 
In order to tune manually, we must compare each string to one another .For that, we need to play the string which is going to be tuned as 'free' and the other string(at the fret with the note of free string) which is used as comparison . Both notes must match until they do keep on rotating the tuning pegs. When we tune the guitar manually, then there is no confirmation whether any note we play is actually the same note.
For example: When you play E string (bass E or the 6th string) it may play A note(as it may be tuned to the note A as you would not have any way to know that). However, the next string or the 5th string would definitely play D(instead of  A) if it's properly tuned manually. This phenomenon is called transposition. That means , as in the example everything is transposed four notes ahead. That mean's if we play A Major Chord then instead (1=A#,2=B,3=C,4=C#) we play D. We would be dealing with the topic of transpose later.

Following is the step by step guide to tune the guitar manually.
Step 1.Play the 5th fret of 6th string(Bass E)  and simultaneously and one by one, play 5th string A as free.
Step 2.Check whether both the notes are the same.
Step 3.If not then rotate the tuning peg of 5th string ( A string) , until both notes match.
Step 4 Repeat the same procedure for every string except when tuning 2nd string(B string) .
Step 5. When tuning B string, play the 4th fret of 3rd string(G String) and simultaneously play
             2nd string(B string) as free.
Step 6. Rotate the tuning peg of B string until both notes match.

So here's almost all for guitar tuning , so stay tuned for pictorial and video demonstration of guitar tuning.  
Share:

Friday 28 October 2016

Learn to play Guitar: Lesson # 13 : Video of guitar crawling exercise

Now , lets watch the demonstrative video and try to practice in the same way. This exercise is a bit difficult and requires practice, but as you practice more and more you'll master it .


As you see it's difficult moving two finger at the same time while leaving two fingers behind. Here's an advice which you can do in the beginning if you can not perform it, you can the take one finger and then use the other finger. You can do it one by one instead of moving two fingers simultaneously.
Try to do it , after some time I am sure you'll be able to do it.
Share:

Tuesday 25 October 2016

Learn to play Guitar: Lesson # 12 : Crawling Exersice

Now that you have seen and understood how the runner exercise is done, we would now be looking at another exercise which as the name suggests is when seen someone doing it looks as though an octopus is crawling through the some difficult test. Well let's go about it and start looking at it

Step 1. Place the four fingers on first four fret of Last string(E string) respectively as shown in the picture.

Step 2. Move Index finger and Ring finger to 5th string(A string) on the same order of frets(only string differs) while let the other fingers be where they are.

Step 3. Move Middle and Last fingers to 5th string(A string) on the same order of frets(only string differs), now all four finger have shifted to 5th string(A string).

Step 4. Repeat the same procedure with all the strings until all four fingers reach the 1st string(E string)

Step 5. Move Middle finger and last finger to 2nd string(B string) on the same order of frets(only string differs) while let the other fingers be where they are.

Step 6. Move First and Ring fingers to 2nd string(B string) on the same order of frets(only string differs), now all four finger have shifted to 2nd string(B string).

Step 7. Repeat the same procedure with all the strings until all four fingers reach the last string(E string)

Next up is video demonstrating this exercise practically.
Gurusuriz!!
Share:

Saturday 22 October 2016

Learn to play Guitar: Lesson # 10 : Exercises

In order to gain some practice to introduce perfection, there are some great basic exercises to be done.
There are two exercises which I recommend you to do daily for at least 60 minutes over the whole day.

The first exercise : The runner

In this exercise , you are given a chance to improve movement of all the fingers on the fret board.

What do you do in it?
You place your fingers respectively and in ascending order of the frets.

For the 6th string(E string)
First place the index finger on the first Fret of the last string(E) and pluck it.


Place the middle finger on the second fret of the last string(E) and pluck it.

Place the Ring finger on the third fret of the last string(E) and pluck it.

Place the last finger on the fourth fret of the last string(E) and pluck it.

Now,Remove all the fingers from the frets.


For the 5th string(A string)
Now we repeat some what similar procedure with the 5th string(A string)
Place the index finger on the second fret of the 5th string(A) and pluck it.

Place the middle finger on the third fret of the 5th string(A) and pluck it.
Place the Ring finger on the fourth fret of the 5th string(A) and pluck it.

Place the last finger on the fifth fret of the 5th string(A) and pluck it.


For the 4th string(D string)
Now,Remove all the fingers from the frets
Now we repeat some what similar procedure for the 4th string(D string)
Place the index finger on the third fret of the 4th string(D) and pluck it.
Place the middle finger on the fourth fret of the 4th string(D) and pluck it.
Place the Ring finger on the fifth fret of the 4th string(D) and pluck it.
Place the last finger on the sixth fret of the 4th string(D) and pluck it.


For the 3rd string(G string)
Now,Remove all the fingers from the frets
Now we repeat some what similar procedure for the 3rd string(G string)
Place the index finger on the fourth fret of the 3rd string(G) and pluck it.
Place the middle finger on the fifth fret of the 3rd string(G) and pluck it.
Place the Ring finger on the sixth fret of the 3rd string(G) and pluck it.
Place the last finger on the seventh fret of the 3rd string(G) and pluck it.


For the 2nd string(B string)
Now,Remove all the fingers from the frets
Now, we repeat some what similar procedure for the 2nd string(B string)
Place the index finger on the fifth fret of the 2nd string(B) and pluck it.
Place the middle finger on the sixth fret of the 2nd string(B) and pluck it.
Place the Ring finger on the seventh fret of the 2nd string(B) and pluck it.
Place the last finger on the eighth fret of the 2nd string(B) and pluck it.


For the 1st string(E string)
Now,Remove all the fingers from the frets
Now, we repeat some what similar procedure for the 1st string(E string)
Place the index finger on the fifth fret of the 1st string(E) and pluck it.
Place the middle finger on the sixth fret of the 1st string(E) and pluck it.
Place the Ring finger on the seventh fret of the 1st string(E) and pluck it.
Place the last finger on the eighth fret of the 1st string(E) and pluck it.

So next up is the video of this exercise for you to understand and learn fully.
Keep it up!

Share:

Friday 21 October 2016

Learn to play Guitar: Lesson # 9

So here it is, Both strumming and playing chords together. As explained in the previous lessons how a chord is determined and the process of remembering it and playing it. This is practically demonstrated now in the uploaded video.

In the video , Chord C Major is played with a simple strumming.


Now, try this on your guitar!!! It's not very easy so playing a chord can't be accomplished first up rather it depends on your practice, you know what they say Practice makes perfect. This phrase is just about perfect for learning and playing guitar.

See you in the next lesson where we'd be learning up a few exercises to improve your over all base  to play the guitar well. The examples would be given with illustrations and videos and detailed account would be given there. So stay learning !!!
Share:

Thursday 20 October 2016

Learn to play Guitar: Lesson # 8

Now that we have figured out how to get the notes of a chord and how to plot those notes in a guitar fret, Now lets try and practically do it.

We will play the same chord we plot in the guitar in the previous lesson which is C Major Chord

First place fingers on the fret step by step.
As you know, you have to place fingers on B,G and A string which are 2nd,3rd and 5th strings on the guitar

So you need to place the fingers as explained in the lesson # 7

We need to press first fret of 2nd string, second fret of 3rd string and 3rd fret of 5th string.

Step 1:
Place the index finger on the 1st fret of B(2nd) string.


Step 2:
Place the middle finger on the 2nd fret of G(3rd) string.


Step 3:
Place the ring finger on the 3rd fret of A(5th) string.


So that's about it for this lesson. Next up, I'll be talking about strumming , Also I'd uploading a video in order for you to learn better how to strum and play a chord.

Stay tuned for the next one! Adios!! .

Share:

Learn to play Guitar: Lesson # 7

Now its time to give you a pictorial representation of the mapping of the chord notes on a guitar.

The filled circle represent where the finger is to be placed and the unfilled circle refers to the free string.

As you can see if you place the fingers as in the picture and strum with the other hand at the body of the guitar, you'll be playing a C Major Chord.
Share:

Learn to play Guitar: Lesson # 6

Plotting of the chord notes in a guitar
Let's now plot for C Major

As learnt from the example of lesson # 5,The three notes for C Major are C,E,G

Now we'll plot the chord string by string, on each string we will calculate whether the string will be played free or which fret needs to be played

1st String E : Play Free
Let's take the first string which is 'E'
As the note is one of the note from C,E,G so this string will be played free

2nd String B : 1st Fret
Lets take the second string which is 'B'
Let's take the progression
Free     1st Fret
B           C

3rd String G : Play Free
Lets take the third string which is 'G'
Let's take the progression
Again as the note is one of the note from C,E,G so this string will be played free

4th String D : 2nd Fret
Lets take the fourth string which is 'D'
Let's take the progression
Free     1st Fret    2nd Fret
D           D#              E

5th String A : 3rd Fret
Lets take the fifth string which is 'A'
Let's take the progression
Free     1st Fret    2nd Fret  3rd Fret 
A           A#              B               C

6th String E : Play Free
Let's take the 6th string which is 'E'
As the note is one of the note from C,E,G so this string will be played free

I hope this illustrates well how to plot the chord notes in a guitar . But to further clarify more details will be given in the next lesson along with pictures of the plotting. So Stay Tuned!


Share:

Wednesday 19 October 2016

Learn to play Guitar: Lesson # 5

Now we are ready to learn how to make Chords:

As you already now know, there are two basic types of chords i.e major and minor chord.
In order to play a chord on the guitar we need to know the notes of which the chord comprises of.
To find the notes of a particular chord,there is a formula to make out notes of a chord.

The formula of the major chord is 158 and for minor chord is 148.
So how does this formula work?

Its simple. Just plot all the possible notes in a line. Start with the note of the chord.

For example 1: We need to find out the notes for C Major. As we are finding C Major we'll plot the notes from the C note.
As discussed lets plot all the notes like this C C# D D# E F F# G G# A A# B 
Now the formula for Major chord is 158, this means take out the 1st , 5th and 8th notes from the above line of notes.
So let's see,
                     1    2     3    4    5   6    7    8
                     C   C#   D  D#  E   F   F#  G

So we get three notes C,E,G

For example 2:
Let's find out D minor.
As it's D chord so notes train would look like this D D# E F F# G G# A A# B C C#
Now, the formula for the minor chord is 148 ,this means take out the 1st ,4th and 8th notes from the above line of notes.
So let's plot according to the formula.
                       
                                  1    2     3    4    5     6    7     8
                                  D   D#  E    F   F#   G   G#  A

So three notes we get D,F,A.

So now we have learned how to figure out the notes of the chord. The next step is to plot those notes on the guitar.

Let's plot and play the chord in the next session.

See you around! Au-Revoir.


Share:

Tuesday 18 October 2016

Question to Win!

Hey everyone.....

Now its time I'd distribute the guitars to the top 2 winners who give the best answers and a live portrait of the 3rd person who is the winner for your live portraits visit the following blog as they are making portraits for you on a canvas !! http://yourportraitoncanvas.blogspot.com/

I am posting the questions here and you can answer in the comments section.

1. What is strumming
2. How many total notes are there??
3. Which are the major types of chords?
4. Which wood is used to make a guitar??
5. How many frets of a guitar??
6. Speculate how to make a chord??

Happy wining :)
Share:

Learn to play Guitar: Lesson # 4

Hosgeldiniz!

A guitar can have more or less than six strings but usual standard lead guitar players use six strings.
Following are the other number of strings used in guitars.

1. 4 String Guitar ( Bass Guitar used for playing bass)
2. 6 String Guitar ( Normally used)
3. 12 String Guitar( It played the same like a six string guitar but used to give shimmering effect)
4. 18 String Guitar

Now we are going to understand what a chord is and how to make a chord!

A chord is a combination of notes played together .To make you understand, I'll give you an example. If we play all the strings or some of the strings of the guitar we are possibly playing a chord.
There are some basic chords which we need to know how those are formed and played in the guitar.

There are two basic types of chords
1 . Major Chord
2. Minor Chord

All the basic chords are derived from a single note, so following are all basic chords .
C,C#,D,D#,E,F,F#,G,G#.
All these chords have a major chord and a minor chord.

In the next lesson, You'll learn how to make a chord. Happy learning!
Share:

Learn to play Guitar: Lesson # 3

Hola!

Now you know the basics of the music and guitar, now it will be easier for you to understand further.

The Picture shows the fret of a guitar, I have written down notes of each free string in the beg.


As you can see in the picture, The notes which are indicated are played when you press that particular fret and pluck the string from below. I hope this is easy to understand for you.                                      

Furthermore, In the next lesson You'd learn about type of guitar, and later about how to make and play a guitar chord. So keep learning! :)                                                                                                                                                 
Share:

Sunday 16 October 2016

Learn to play Guitar: Lesson # 2

Hey guys!

Now that you guys are already familiar with the parts of the guitar lets go on and learn some more!

In this lesson we'd learn today regarding the notes of each string of a six string guitar.

If pluck a string of a guitar it will play a note, so the base is to know which note is this.
Once you know that you can play any note you want by pressing your fingers just before the frets of the guitar.

Below I am enlisting the notes of each string, from the first string which is the thin one to the last string which is the thickest one.

E-
B-
G-
D-
A-
E-

Guys, you have to memorize this, so that you know what note you are playing or want to play.
Stay tuned for the next session where i will give a detailed extension of these notes on the frets of the guitar.

Adios!
Share:

Saturday 15 October 2016

Learn to play Guitar: Lesson # 1

In the First Lesson, We'd talk about parts of the guitar.

The parts can be seen in the picture also.

1. Head: The top part is called the Head
2. Tuning pegs: The Pegs to tune the strings(wires like) are called tuning pegs
3. Body: The bottom hollow part of the acoustic guitar with the hole is called Body.
4. Neck: Neck is between Head and Body
5.The lines forming partitions in the neck are called Frets, Inside each segment are fingers pressed and Note of the guitar changes.
6. Strings: The wire like material which creates the actual sound of the guitar.
7. Nut: The part of the guitar which has small slits in it to pass the strings from tuning pegs to neck to keep the strings stable.
8. Bridge: The bridge is placed near the end of the body and this is where the strings ends are attached.

Stay tuned for the next lesson and Happy learning :)

Share:

Learn to play guitar : Introductory session

My previous post contained ways to earn good money which also included being a musician and composer. For you to be a composer and a musician you need to select an instrument.

The best instrument for that purpose is the guitar. Here in this blog now i will impart lessons for you to start learning guitar.

Types of Guitar:

1.Acoustic Guitar
2.Electric Guitar
3.Electro-Acoustic Guitar

To learn well you will need to start from the natural guitar i-e Acoustic guitar.
At the end of the lessons i will give out a quiz and the one who scores the most in the quiz will win a guitar!, Yes thats True, I'll give out GUITARS!

Well back to our lesson, First of all there are seven Notes of Music as given ,
C D E F G A B C
The Notes are always cyclic, always the eight note is the same as the first note.
However there is a Variation of each note called Sharp as given below.
C C# D D# E F F# G G# A# B C C#
If you'd notice that the notes E and B do not have Sharp. The above picture is how guitar notes change.

Now I will explain all the workings of the basic music and guitar step by step, Just keep tracking the next lessons I ll be giving and study carefully as you can get a FREE GUITAR though!

Share: